
In part 1 of this series, we looked broadly at the anatomy of a fightstick and what to consider when you begin making changes or repairs. In part 2 we’ll dive deeper into the moving parts of the iconic fightstick lever. I’ll walk through how levers work and what you can do to fine-tune a lever to your playstyle and preference.
Fightstick levers are far and away the most complex input device on any fightstick. That said, levers are still pretty straightforward, and offer several ways to improve and customize the feel of any fightstick. Check out this video from retailer FocusAttack.com to see how a typical lever comes together.
A Look Inside
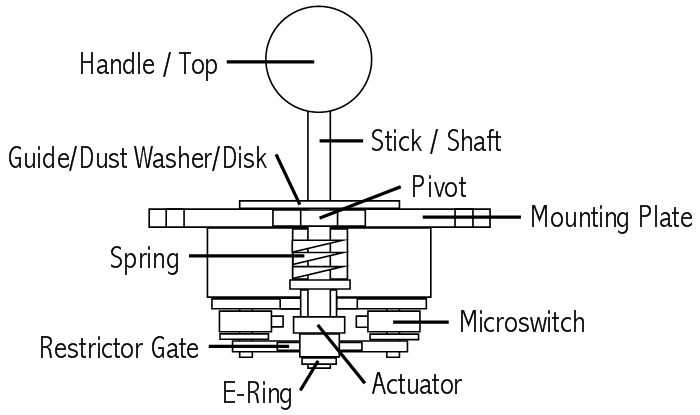
There are only a few key components that make up levers, but those parts work together in a precise way. A standard fightstick lever consists of a central shaft with a handle that, when pushed in any direction, touches a microswitch wired to one of four directions (up, down, left, or right). In Japanese levers a square or octagonal “gate” helps guide the lever, while a rounded bushing keeps the action smooth. A thick actuator at the bottom actually presses each microswitch.
Levers also require another component to create tension, allowing the stick to return to “neutral” (equal distance from any switch). In part 1 of this series, we mentioned how common Japanese and Korean levers differ in how they accomplish this: with a spring or rubber grommet above the actuator, respectively. In the interest of time, I recommend this blog post from player “blankaex” to get a better understanding of the differences.
 It’s easy to get lost in the details with so many moving parts. Any of the components mentioned here can be modified: shafts can be extended, heavier springs can be swapped in, and even actuators can be made smaller or larger to change “throw” (the distance a lever travels before hitting a switch).
Which type of lever you choose depends on several things, so approach it simply. Most mid- to high-end levers come with a Japanese Sanwa JLF lever already installed. The Sanwa JLF is a sturdy, reliable, and reasonably priced lever. It’s a great baseline to help understand what you want to improve; one that we’ll use for all examples in this guide.
Gates
One of the most accessible modifications to a Japanese fightstick lever is to its restrictor gate. This plastic plate snaps to the bottom of a lever above the microswitches. Restrictor gates come in many shapes, but fighting game players typically focus on square or octagonal gates. Since Korean levers use a collar instead of a gate, the following doesn’t apply to them.
Square gates are standard in most arcade machines, and provide easy access to corner directional inputs. This allows for a smooth transition from, say, back to down-back. There are even some fine-tuned square gates available that can adjust the throw distance and precision of these movements, such as the “rounded square” gate found in this OttoDIY upgrade kit.
The OTTO DIY upgrade kit improves the function and durability of several joystick parts, and even allows a partial “conversion” from Japanese to Korean-style lever. I highly recommend either the V2 or V5 kit to those feeling out joystick upgrades. Totally not a paid plug…these are just really great kits. – Ramblin’ Rob
 Because of the flattened sides, some beginners find motions like quarter-circle forward or “shoryuken” inputs awkward with a square gate. Many players choose to swap in an octagonal gate that provides a notch at each of the eight directions, not just the corners. This lets the shaft land directly on the necessary switch, reducing the likelihood of over-extending a motion and creating unwanted inputs.
Octagonal gates may add an extra layer of comfort, but there can be trade-offs. Many experienced players have cautioned that one can easily get too comfortable with the added precision. Much of learning fighting games is tied to muscle memory, and using an octagonal gate early can lead to bad habits if one has to use another controller, or decides to return to square gates later.
I’ve tested both at length and personally found no real advantage to either option. Square gates provide a bit less tactile feedback to complex inputs, but I’ve had octagonal gates fail to input diagonals due to incorrectly sizing. That said, octagonal gates are cheap and easy to install, so there’s no real harm in keeping both on hand until you find what works best.
Springs/Grommets and Actuators
Tension plays a big part in how a lever feels during play. The spring on a typical Japanese lever applies enough resistance to keep the stock shaft from wobbling and makesmovement easy. Some players prefer a more rigid feel to their stick, or add other modifications that require more tension to offset extra weight.
 2, 3, and 4 pound tension springs exist to fit most Japanese levers. You can opt for a heavier spring if your stock lever feels “loose” or you feel like you add extra inputs unnecessarily when you play. This is a pretty subjective modification: heavier springs don’t really change how a lever works, technically. If you want a heavier spring but aren’t sure what you need, go for a 2lb spring first. It adds more tension than you think.
If you modify your lever shaft, for example with a heavier ball- or battop handle or a detachable shaft, this can sometimes add weight to the top part of your lever. This can actually affect lever performance, this can make the shaft feel loose or even allow the shaft to rock past neutral and hit an opposite switch. If you plan to order a heavier handle or something like the Phreakmods Link, throw a heavier spring in. You’ll be glad you did.
Grommets for Korean levers follow a similar pattern, where various densities of rubber control how fast the shaft bounces back. Keep the same things in mind as above when choosing a grommet, but be warned: there are many more tension options for each Korean stick, and each type requires a different grommet shape. Check your product descriptions.
The actuators that actually press lever switches also come in a couple different sizes. Larger actuators reduce the throw distance of a lever, effectively allowing you to input directions faster as the shaft has less distance to travel. If it feels like your inputs are too slow (for example, if you have trouble with special or super techniques in Street Fighter), you may benefit from a larger actuator. Replacements are pretty cheap, so feel free to experiment. It might take some time to find what you like.
Handles and Shafts
Lever handles go a long way toward influencing how comfortable a lever is to play. Balltop and battop handles are both common to arcade machines of any era, though battop handles are more commonly paired with Korean levers. Players at every level have opinions on each type, but there’s no distinct advantage to either shape.

Battop levers are, as the name suggests, long and tapered. They’re larger than balltop handles and may provide a more comfortable grip depending on how you hold your stick. Balltop handles have a lower profile and are well-suited to a “wine-glass” grip (palm under the handle, with the shaft between your middle and ring finger). Most retail fightsticks ship with a balltop handle, and a standard Sanwa lever may require a threaded insert to fit an aftermarket battop handle.
Handles can be made of different materials that do affect the weight to a small degree (which can impact how the shaft moves, as previously mentioned). Most are made from solid molded plastic, but resin, aluminum, and even wood handles exist. Which material you choose doesn’t matter much, but keep the weight change in mind and grab a heavier tension spring (or swap to a stock spring) if needed.
Lever shafts are a straightforward and essential component. While there’s not much room for customization here, there are some functional options to consider. Standard levers are mounted to a plate, and that plate typically sits only a few millimeters below the surface of a plastic lever case. This means the lever shaft extends a set distance above the top of the case (typically 23 to 24mm from the case to a balltop handle). If you’re mounting a lever to a thicker case-for example, 1/4″ wood, you may need a shaft extender to get closer to that length.
Arguably the most sensible modification you can make to a lever shaft is to purchase a removable one. There are two popular options for this on the market right now: the Phreakmods EX Link and Sanwa’s own detachable shaft. I can honestly recommend either one, as they’re both well-made and easy to use.
The Link is a faster option, and comes with all the parts you need to replace a standard Sanwa lever shaft. The Sanwa shaft screws in to provide a sturdier feel than the Link, but isn’t currently available without purchasing the entire lever assembly. Either way, these removable shafts instantly make traveling with a fightstick easier, since you don’t need to protect the lever while it’s stuffed awkwardly in a bag.
Final Notes
There are certainly more essential pieces to any lever, but I’ve found few customizations to these parts that are necessarily worth covering. Microswitches, bushings, plates, and other parts don’t vary all that much. That said, here are a few extra things to keep in mind about microswitches and maintenance:
- Microswitches tend to break individually, not all at once. If your lever features individual switches, keep a handful of new ones around. They connect with a positive and ground wire, just like pushbuttons, and are easy to install.
- Sanwa and some other companies solder switches to a printed circuit board so they can connect using a simple 5-pin harness. If one switch goes out you can desolder it from the board, but it may be more cost-effective to replace the entire switch assembly.
- Some levers don’t use clicky microswitches. Hori’s Hayabusa “silent” lever, for example, uses optical switches for smoother movement. The Hayabusa is a well-regarded alternative, but notoriously difficult to mount into many commercial fightsticks.
- Take the time to grease your lever bushings any time you disassemble or clean your fightstick. This keeps movements smooth and extends the life of lever components.
 Lever modifications can make any fightstick truly yours, and there are certainly levels of precision customization that go beyond what we discussed here. Remember as you go that nearly any modification you can is entirely based on what you hope to achieve; how you want your stick to feel.
Many consider some of these changes automatic improvements, but opinions differ in literally every scenario I’ve seen. Trying out a mod that doesn’t feel right often makes it clear what does, and there’s no harm in having spare parts handy.
In part 3, we’ll take a closer look at fightstick buttons: the different sizes and types, how to wire them into a stick, and the infamous hitbox.


Comments